Fuel pump relay replacement ranks among the most cost-effective automotive repairs that DIY mechanics can perform at home. This simple electrical component controls power delivery to your vehicle’s fuel pump system. When relays fail, cars won’t start or may experience intermittent stalling issues that strand drivers unexpectedly. Wanna Taxi understands how frustrating vehicle breakdowns can be, which is why learning basic repair skills helps drivers maintain reliable transportation.
Professional mechanics charge significant labor fees for relay replacement, though the actual work requires only basic tools and minimal technical knowledge. Most fuel pump relays cost between five and twenty dollars, making this repair extremely budget-friendly. Additionally, the replacement process typically takes less than thirty minutes when you have the right equipment and know-how.
Understanding proper fuel pump relay repair procedures and having appropriate tools readily available can save hundreds of dollars in towing fees and service charges. Therefore, building a basic automotive tool collection pays for itself after just a few successful DIY repairs.
Understanding Fuel Pump Relay Basics
How Fuel Pump Relays Function
Fuel pump relays act as electrical switches that control high-current flow to fuel pump motors. These small devices protect vehicle wiring systems from excessive electrical loads while allowing precise control over pump operation. Additionally, relays provide isolation between low-power control circuits and high-power pump circuits.
Most modern vehicles use four or five-pin relays mounted in fuse boxes under the hood or dashboard. These standardized components share similar designs across different manufacturers, making replacement procedures relatively consistent. However, relay locations and pin configurations may vary between vehicle models and years.
When ignition switches activate, control modules send signals to fuel pump relays, which then complete circuits that power fuel pumps. This two-stage process prevents accidental pump activation while providing reliable operation during normal driving conditions. Therefore, understanding relay operation helps diagnose problems and select appropriate replacement components.
Common Failure Symptoms
Failed fuel pump relays typically cause no-start conditions or intermittent stalling during operation. Engines may crank normally but fail to start due to lack of fuel pressure. Additionally, some vehicles experience hesitation, rough idling, or unexpected stalling when relays fail intermittently.
Clicking sounds from relay locations often indicate mechanical contact problems within relay assemblies. These audible symptoms help pinpoint faulty components during diagnostic procedures. However, silent failures are also common and require systematic testing to identify problematic relays.
Heat-related failures cause intermittent problems that worsen as ambient temperatures rise or after extended driving periods. These temperature-sensitive issues can be particularly frustrating since problems may disappear after cooling periods. Therefore, understanding failure patterns helps develop effective diagnostic strategies.
Essential Hand Tools for Relay Work
Basic Pliers and Gripping Tools
Needle-nose pliers provide precise gripping capability for removing relays from tight spaces in fuse boxes. These versatile tools allow careful extraction without damaging surrounding components. Additionally, their pointed tips reach into narrow openings where fingers cannot access relay terminals.
Standard pliers with wider gripping surfaces help remove stubborn relays that resist normal pulling forces. Some relays fit tightly in their sockets and require additional leverage for safe removal. However, excessive force can damage relay sockets or surrounding electrical connections.
Relay pullers, though specialized, offer the safest removal method for delicate electrical components. These inexpensive tools distribute pulling forces evenly across relay bodies to prevent cracking or terminal damage. Therefore, investing in proper removal tools prevents costly secondary damage during repair procedures.
Flashlights and Inspection Equipment
LED flashlights or headlamps provide essential illumination for working in dark engine compartments and interior fuse box locations. Good lighting prevents mistakes and helps identify correct relay positions. Additionally, hands-free lighting options allow simultaneous tool use and component handling.
Magnetic flashlights attach to metal surfaces near work areas, providing stable illumination without requiring additional hands or support structures. These convenient tools free up hands for actual repair work while maintaining optimal lighting conditions. However, ensure magnets won’t interfere with electronic components or sensors.
Inspection mirrors help examine relay installations in cramped spaces where direct visual access is impossible. Small mirrors on telescoping handles reveal relay positions, pin configurations, and socket conditions. Therefore, proper inspection tools prevent incorrect installations and identify potential problems.
Testing Equipment for Accurate Diagnosis
Digital Multimeters
Digital multimeters represent the most versatile electrical testing tools for automotive relay diagnosis. These instruments measure voltage, current, and resistance values that determine relay functionality. Additionally, continuity testing capabilities help identify internal connection problems within relay assemblies.
Basic automotive multimeters suitable for relay testing cost less than fifty dollars and provide adequate accuracy for most diagnostic needs. Advanced features like data logging or computerized analysis add cost without significant benefit for basic relay work. However, auto-ranging capabilities simplify measurements and reduce operator errors.
Test lead quality affects measurement accuracy and operator safety during electrical testing procedures. Invest in leads with proper insulation, secure probe connections, and adequate current ratings. Therefore, quality test leads prevent accidents and ensure reliable measurement results throughout their service life.
Relay Testing Methods
Swap testing provides the simplest diagnostic method when multiple identical relays exist in the same fuse box. Exchange suspected faulty relays with known good units to isolate problems quickly. Additionally, this method requires no special equipment and works effectively for most common relay failures.
Voltage testing at relay sockets determines whether control circuits function properly and power reaches relay terminals. Measure voltage at pin positions according to vehicle-specific wiring diagrams. However, testing procedures vary between four-pin and five-pin relay configurations.
Resistance testing of relay coils and contacts identifies internal failures that cause operational problems. Remove relays completely before performing resistance measurements to avoid interference from connected circuits. Therefore, systematic testing procedures help distinguish between relay failures and external circuit problems.
Socket and Connector Maintenance Tools
Electrical Contact Cleaners
Dielectric grease protects electrical connections from corrosion and moisture intrusion that can cause intermittent relay problems. Apply small amounts to relay pins and socket contacts during installation. Additionally, quality dielectric compounds provide long-term protection in harsh automotive environments.
Contact cleaner sprays remove corrosion, dirt, and oxidation from relay sockets and pins that interfere with proper electrical connections. These specialized solvents evaporate quickly without leaving residues. However, ensure cleaners are safe for use on plastic components commonly found in automotive applications.
Wire brushes with fine bristles clean corroded relay pins and socket contacts without causing damage to delicate electrical connections. Brass or bronze bristles work effectively while being softer than steel components. Therefore, proper cleaning tools restore good electrical connections and prevent future problems.
Socket Repair Components
Replacement relay sockets become necessary when original units suffer heat damage or terminal corrosion beyond repair capabilities. Universal sockets with pigtail wires splice into existing harnesses using standard electrical connectors. Additionally, complete socket replacement often proves more reliable than attempting repairs on damaged originals.
Heat-shrink tubing provides professional-quality protection for spliced connections during socket replacement procedures. This material contracts when heated to form weatherproof seals around electrical joints. However, use appropriate sizes and shrinkage ratios for specific wire gauges and environmental conditions.
Electrical tape serves as backup protection for heat-shrink connections and temporary repairs during emergency situations. Quality electrical tape maintains adhesion and insulation properties under automotive temperature extremes. Therefore, keeping various tape types available ensures completion of repair procedures under different circumstances.
According to research published by the National Institute for Occupational Safety and Health, proper tool selection and maintenance procedures significantly reduce workplace injuries and improve repair quality in automotive service environments.
Budget-Friendly Tool Sources and Alternatives
Harbor Freight and Discount Options
Harbor Freight Tools offers comprehensive automotive tool selections at budget-friendly prices suitable for occasional DIY use. Their basic hand tools, multimeters, and flashlights provide adequate quality for fuel pump relay replacement procedures. Additionally, frequent sales and coupons reduce already low prices further.
Dollar stores and general retailers stock basic electrical supplies like electrical tape, wire nuts, and simple tools that work adequately for emergency repairs. While quality may not match professional-grade equipment, these sources provide accessible options for budget-conscious consumers. However, invest in quality safety equipment regardless of budget constraints.
Online marketplaces like Amazon and eBay offer competitive pricing on automotive tools with customer reviews that help guide purchase decisions. Bulk purchasing of consumable supplies like electrical tape and dielectric grease reduces per-unit costs. Therefore, strategic purchasing from multiple sources maximizes tool budgets.
Tool Borrowing and Sharing
Local auto parts stores often loan specialized tools like multimeters and relay pullers to customers purchasing related parts. These tool lending programs provide access to quality equipment without purchase costs. Additionally, parts store employees can offer advice on tool selection and usage techniques.
Community tool libraries and maker spaces increasingly include automotive tool collections available to members. These shared resources provide access to expensive equipment for occasional users. However, reserve tools in advance and understand borrowing policies to ensure availability when needed.
Friends and neighbors with automotive experience often willingly share tools and expertise for simple repairs like relay replacement. Building relationships within local car enthusiast communities creates mutual support networks. Therefore, community connections provide both tool access and valuable learning opportunities.
Step-by-Step Replacement Procedures
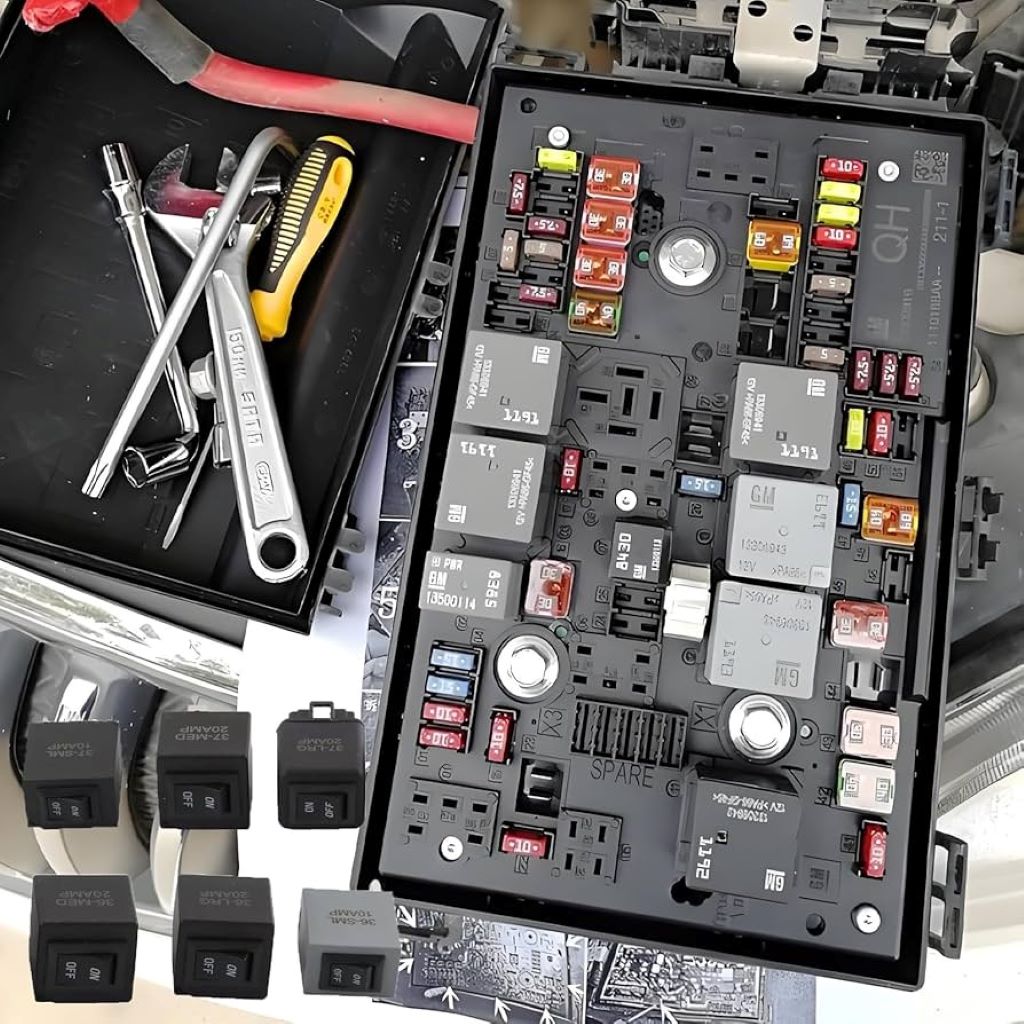
Locating Fuel Pump Relays
Consult vehicle owner’s manuals or online resources to identify fuel pump relay locations and part numbers for specific makes and models. Relay positions vary significantly between manufacturers and model years. Additionally, some vehicles have multiple fuel pump relays or complex control systems.
Fuse box covers typically include relay identification diagrams that show component locations and functions. These diagrams provide essential reference information during repair procedures. However, verify diagram accuracy against actual relay installations since modifications or repairs may have altered original configurations.
Visual inspection of relay markings and part numbers helps confirm correct component identification before removal. Take photographs of relay positions and wiring configurations before beginning work. Therefore, documentation prevents confusion during reassembly and ensures correct installation.
Safe Removal Techniques
Disconnect vehicle batteries before working on electrical systems to prevent short circuits and component damage. Battery disconnection also prevents accidental fuel pump activation during relay removal. Additionally, allow systems to cool if recent driving has heated engine compartment components.
Grasp relays firmly but gently to avoid cracking plastic housings or damaging terminal pins. Rock relays slightly side-to-side while pulling to overcome socket friction without excessive force. However, never pull on relay wires or attempt to remove relays using inappropriate tools.
Clean relay sockets and surrounding areas before installing replacement components to ensure good electrical connections. Remove any corrosion, dirt, or debris that might interfere with proper relay seating. Therefore, thorough preparation prevents premature failure of new relay installations.
Installation and Testing
Apply thin layers of dielectric grease to relay pins before installation to protect against corrosion and ensure reliable electrical connections. Avoid excessive grease application that might interfere with proper socket engagement. Additionally, ensure relay orientation matches original installation position.
Press replacement relays firmly into sockets until fully seated and secure. Partial installation can cause intermittent connections and operational problems. However, avoid excessive force that might damage relay housings or socket terminals.
Reconnect batteries and test fuel pump operation before reassembling engine compartment components. Listen for fuel pump activation when ignition switches turn on. Therefore, functional testing confirms successful repair completion and prevents repeat service calls.
Creating a Relay Repair Kit
Essential Components Inventory
Stock common relay types used in your specific vehicle models to enable quick repairs without parts store trips. Include both four-pin and five-pin variants since different systems may use different configurations. Additionally, keep spare fuses since relay failures sometimes affect related circuits.
Maintain supplies of electrical tape, heat-shrink tubing, and dielectric grease for connection maintenance and protection. These consumable items have long shelf lives and multiple automotive applications. However, store supplies in dry conditions to prevent deterioration.
Include basic hand tools like pliers, flashlight, and multimeter in dedicated automotive repair kits. Having complete tool sets readily available speeds repair procedures and prevents project delays. Therefore, organized tool storage improves efficiency and reduces frustration during repair work.
Storage and Organization
Plastic storage boxes with compartments keep relay repair supplies organized and easily accessible during emergency situations. Label compartments clearly to speed component location during stressful breakdown scenarios. Additionally, waterproof containers protect supplies from moisture damage.
Vehicle glove compartments or trunk storage areas provide convenient locations for emergency relay repair kits. Choose storage locations that remain accessible even when vehicles are disabled. However, avoid areas subject to extreme temperature fluctuations that might damage electronic components.
Update repair kits periodically by replacing expired supplies and adding tools based on experience with specific vehicle types. Maintain inventory lists to track supplies and identify items needing replacement. Therefore, systematic maintenance ensures repair kit readiness when needed most.
According to Consumer Reports, regular maintenance of automotive electrical systems, including relay replacement, can prevent costly breakdowns and extend vehicle service life significantly.
Advanced Troubleshooting Techniques
Circuit Analysis Methods
Wiring diagrams provide essential information for tracing electrical problems beyond simple relay failures. These technical documents show complete circuit paths, component relationships, and testing points. Additionally, understanding circuit operation helps identify root causes of relay failures.
Voltage drop testing reveals hidden resistance problems in wiring harnesses and connections that can cause premature relay failure. Measure voltage differences between circuit endpoints to identify problem areas. However, voltage drop testing requires systematic procedures and proper measurement techniques.
Load testing determines whether fuel pumps draw excessive current that might overload relay contacts. High current draw can cause relay contact burning and premature failure. Therefore, comprehensive testing identifies both symptoms and underlying causes of electrical problems.
Preventive Maintenance Strategies
Regular relay socket cleaning prevents corrosion buildup that causes connection problems and relay failures. Schedule socket maintenance during routine vehicle service intervals. Additionally, applying dielectric grease during cleaning procedures provides long-term protection.
Heat management around relay locations helps prevent temperature-related failures in harsh automotive environments. Ensure adequate ventilation and consider relocating relays away from heat sources when possible. However, modifications must maintain proper electrical connections and system functionality.
Systematic relay replacement during major service intervals prevents roadside failures of aging components. Track relay service history and replace units approaching expected service life limits. Therefore, proactive maintenance prevents inconvenient breakdowns and reduces emergency repair costs.
Conclusion
Budget-conscious automotive enthusiasts can successfully perform fuel pump relay replacements using basic tools and systematic procedures. Essential equipment includes simple hand tools, basic multimeters, and common electrical supplies available from discount retailers. Additionally, understanding relay operation and failure symptoms enables accurate diagnosis and effective repairs.
Building comprehensive relay repair kits with appropriate tools and spare components enables quick responses to electrical failures. Proper tool selection balances cost considerations with quality requirements for safe and reliable repairs. However, investing in quality safety equipment remains essential regardless of budget constraints.
Key success factors include systematic diagnostic procedures, proper tool usage, and thorough testing after repairs. Preventive maintenance and organized supply management reduce both failure frequency and emergency repair costs. Therefore, combining budget-friendly tools with proper techniques provides cost-effective solutions for fuel pump relay maintenance.
Frequently Asked Questions
What tools do I absolutely need for fuel pump relay replacement? Essential tools include needle-nose pliers for relay removal, a basic multimeter for testing, and a flashlight for visibility. Additionally, keep electrical tape and dielectric grease for connection protection. These basic items handle most relay replacement scenarios successfully.
How much should I budget for a complete relay repair tool kit? A basic tool kit including quality hand tools, multimeter, and supplies costs approximately $50-75 from discount retailers. Professional-grade equipment costs more but provides better durability for frequent use. However, basic tools prove adequate for occasional DIY repairs.
Can I use automotive multimeters for other electrical repairs? Yes, automotive multimeters work effectively for most vehicle electrical diagnostics including battery testing, alternator checking, and general circuit analysis. These versatile instruments justify their cost through multiple applications. Additionally, digital models offer user-friendly operation for beginners.
Where can I find vehicle-specific relay information? Owner’s manuals, online repair databases, and auto parts store resources provide relay specifications and locations for most vehicles. Additionally, manufacturer websites often include technical service bulletins with relay information. Therefore, multiple information sources ensure accurate component identification.
How often should fuel pump relays be replaced preventively? Most fuel pump relays last 100,000+ miles under normal conditions, though harsh environments may reduce service life. Replace relays showing signs of overheating, corrosion, or intermittent operation regardless of mileage. However, preventive replacement during major service intervals prevents roadside failures.
Read More:
Winter Car Care Hacks to Prevent Cold Weather Damage
Repairing Small Cracks in Windshield Without Full Replacement